Image Map

Monday, March 8, 2021

Strategies for Teaching Elapsed Time

I’m going to be completely honest here, I used to HATE teaching elapsed time to my students. Elapsed time can be a difficult concept for students to master. Especially when it involves word problems. I always felt like I spent so much time focusing on having my students master the concept of elapsed time. When I first started teaching, I didn’t have tons of resources to help my students master this skill. Throughout my 16 years in the classroom, I have found some strategies and activities that help my students become elapsed time masters. Now, I look forward to teaching elapsed time to my students.

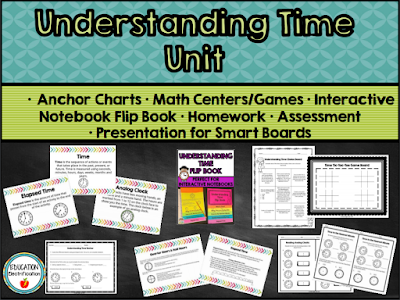
 Understanding Time Unit

Understanding time can be difficult for students.  I have found that teaching your students how to correctly read and tell time deepens their understanding. I made this unit to help deepen my students understanding of time. The skills addressed in this unit are time basics, how to read analog and digital clocks, time to the nearest minute, quarter and half hours, and elapsed time. This unit gives students time to explore, understand, and explain time.


When I created this unit, I wanted to include everything a teacher needs in the classroom.

This unit includes:

  • A SmartBoard presentation explaining each skill with assessment
  • Homework for each skill
  • Time centers & games
  • choice board for a project-based learning approach
  • Anchor charts for key vocabulary
  • An interactive notebook flipbook on the different time skills
  • Assessment


 Making an Elapsed Time Clock

When we start our unit on time, I have each of my students make a paper plate elapsed time clock. The clocks are super easy to make. All you need are paper plates, brads, glue, scissors, and a paper copy of the clock face and minute and hour hands.


I like making paper plate elapsed time clocks because they are super cheap to make, and my students can take their clocks home with them to help with their homework. I let my students use this clock when we first start learning elapsed time. I have found that creating these clocks really helps my hands-on and visual learners. When they physically move the minute and hour hands, they begin to understand how a clock works. I let them use these clocks at the beginning of our unit, and phase them out as we progress through the unit.


I also use dry erase elapsed time clocks. These clocks have analog and digital clocks. I find that my students are strong with digital time skills and weaker with analog clock skills. It makes sense because they have so much more experience with digital clocks these days. While teaching time, we use these clocks for the students to see the time both ways. They need to make the connection that both clocks are showing the same time. Plus, these clocks are perfect for a quick review. Sometimes I will pass out these clocks and give them time to write both ways. After they have written their answers, I have my students hold up their clocks to show me their answers. By looking at the clocks, I can quickly see what students need small group instruction, and what students need to be challenged.


These clocks can also be used when finding the elapsed time. I will have my students write the starting time in the analog clock. I will then give them an elapsed time problem. While they are solving the problem, they can use the analog clock to help them find the answer, and then they will record the time in the digital clock. I love using this strategy with small group instruction. This really helps students who need extra practice. These clocks are also great to include in elapsed time centers as a tool to enhance student learning.

 Elapsed Time on a Timeline Anchor Chart


 Who doesn’t love a great anchor chart!?! I love using anchor charts in my classroom. They are such a great tool to give the students the information they need. I teach elapsed time using different strategies in my classroom, but I have found that my students really love using the timeline method for finding the elapsed time.  When teaching this unit, I always keep this anchor chart out to help my students.

 Elapsed Time Choice Boards

I love giving my students a choice in their learning. After all, every student learns differently. Some students are artists, some musicians, and others problem solvers. I have found that choice boards give my students that freedom in their learning. When students use choice boards, they get to use their multiple intelligences to learn.

I created a choice board for my time unit. It’s a great tool in the classroom and can be used in many different ways. I have used it as early finishers' work, as a math center, and as a math project. This choice board gives students time to work on time independently and includes a checbric for easy assessment.

 Elapsed Time Games

I love a good review game. Games make learning fun, and I believe that learning should be fun! Here are two of my favorite elapsed time games to use in the classroom.

 Elapsed Time Task Cards

I love task cards! You can use task cards in so many ways in your classroom. You can use them in a center, as a whole class Scoot review game, as an early finisher activity, for students who need extra practice, and so much more.

Task cards are such a fun way to review finding the elapsed time. I recently made a Superhero Themed Elapsed TimeTask Card Review Game. I made this because I wanted to make solving elapsed time word problems fun for the students. They love completing these task cards because of the superhero references. The best part is that these task cards can use it can be used digitally in Google Classroom, or you can print the cards out to use in the classroom. They work well in any classroom.

 Elapsed Time Bingo


One of my favorite review games is Elapsed TimeBingo. My students always love this game. I like to play this as a whole class game. I give each student a Bingo card, and project the problems on the smartboard. Those paper plate clocks come in handy for this game too! I wrote another blog post about this game. Feel free to read that post here.


                                                            electrified siggy

Thursday, September 21, 2017

Making Place Value Fun!


Every school year we start math with the same unit, place value. Over the years I have used many different strategies to engage the students and make learning place value fun. Below are a few of my favorite activities and strategies.

I always start my unit out using this lesson pack. The presentation is perfect for introducing the unit and goes over key vocabulary terms like digit, place value, and period. These terms lay the foundation for understanding place value, and students need to comprehend these terms before moving on. This pack also goes over understanding the difference between the place of a digit in a number and its value.  

After the presentation there is a quick ten question review you can use to quickly assess student learning. If students need extra practice, the "I Am the Greatest Game" at the end of the presentation is a perfect way to give students extra practice and wrap up the lesson.


Once we go over place value, I have my students create place value pictures. This activity is a fun assessment and a great way to incorporate art in the classroom.

To do this activity you need to give each student a piece of white paper and a copy of the Hundreds, Tens and Ones paper from my Place Value Games and Centers Pack. Student will then use the hundreds, ones, and tens pieces to create a place value picture. Once they have created their picture, they need to count how many hundreds, tens, and ones pieces they used and add them together to find the total represented by their picture (see the example above). 


This activity is real easy to differentiate for diverse learners. You can have them use a certain number of pieces, or set a place value goal for their pictures. One of my favorite things to do is to assign the students a number and have them make a picture using the different pieces.
If you bought the adorable “Hello My Name Is...” name tags from Bullseye's Playground at Target this summer, this activity is perfect for you! Really, any name tag would work for this activity, but the Target name tags are super cute. 

You could even set up a center with place value blocks and have the students create place value sculptures like the picture below.


Expanded, Standard, and Word Form Match-up is a great way to review and practice number form skills. This activity can be done individually, as a center, group work, or as part of a math lesson. Students will practice their expanded, standard, and word form skills with this match-up game. While playing this game, your students will match a number in standard form with its expanded and word form match. The numbers in this activity go up to the hundred thousand place. 


Standard, Expanded, and Word Form Name Tags


Before doing this activity, I took the name tags and divided them into groups of three. I then picked a number and wrote it in standard form on one tag, expanded form on another, and word form on the last tag in that set. I did this until I had a class set of 22. Now you math teachers might be saying, "Wait a minute, you can't divide 22 into three equal groups." Since I have 22 students, I had three groups of seven and made my extra student a name tag that said group checker.

Before we started our math lesson, I gave each student a name tag. We learned about the different number forms and for a summarizing strategy I had each student find their matching partners. When a group of students found their matches, my group checker made sure the matches were correct.  My students absolutely loved this activity!


I love choice boards. They offer students a choice in how they show their learning, teach to the multiple intelligences, and keep students actively engaged. Let’s face it, anything is better than a boring worksheet! I first learned about choice boards during teacher training a couple years ago and I have been using them regularly in my classroom ever since. They have been a huge success! I will sometimes use them in place of a major test grade at the end of a unit. My students really like doing this chioce board on place value, which can be modified for the different levels of student learning.


electrified siggy


Monday, July 31, 2017

Back to School STEM Challenge

The start of the school year is my favorite time of year. Everything is new. The students are with a different group of peers and everyone is getting to know each other. It's a great time for me, the teacher, to observe my class and the student dynamics. I've found that I get the best feel for my class by assigning group projects on those first few days of school.  Group projects are great because the students have to collaborate with one another. While they are working, I can see which of my students are leaders, rule followers, creative thinkers, and which students need an extra push. 

Science is my absolute favorite subject to teach. I love the hands on learning opportunities science gives my students. So the back to school projects in my classroom have a STEM focus.  My Back to School STEM Activities Set has three of my favorite STEM challenges perfect for the beginning of the school year. 


This set includes three STEM challenges. Each challenge has a teacher directions page, student planning sheet, and a student directions page that you can print for each group or easily display on your Smart Board. This pack also includes STEM group work task cards. 


These cards assign each group member a specific task while completing each challenge. These cards are optional, but they help keep reluctant students engaged. 

There are only a few budget friendly supplies needed for each challenge and setting up each activity is super easy. All you need to do is print our a few papers and you are good to go!

Each challenge has a student directions page, student planning sheet, and STEM work task cards.

The STEM group work task cards can be used for any STEM activity you do in your classroom. I would recommend laminating the cards once you print them so you can use them throughout the school year. 


I like to keep each group's STEM cards in a Ziploc bag so they are ready for any STEM activity. I also like to use a sharpie and write the group number on the bottom right hand corner of each card. STEM challenges have the students moving around the classroom and sometimes the cards get mixed up. I have found that this makes life much easier when it comes time to clean up.


I like to have each challenge prepped with all of the supplies ready to go before each school day. When I get the supplies ready, I like to give each group a copy of the challenge direction sheet, a set of STEM group work task cards, a planning sheet for each student, and all of the extra supplies they need for the activity.  I found these awesome $3 trays at Target in Bullseye's Playground and they are perfect for holding all of the supplies you will need for each challenge. 


Once you have everything prepped, you are good to go! You can observe your students, and learn about your class while keeping them engaged with fun STEM challenges.


Tuesday, June 13, 2017

Breaking Out of the Classroom


Are you looking for a fun and rigorous way to end the school year? A colleague recently introduced me to an amazing site called BreakoutEDU. This site has tons of breakout room games ready to go for your classroom.  The breakout games work like the fun breakout rooms that seem to be popping up everywhere. Your students are introduced to a problem that they need to work with the class or small groups to solve in a certain amount of time. These games are great because they make students think outside of the box. The students have to collaborate, use higher level thinking skills, and work as a team.

The best part about this site is that these games are 100% free and teacher friendly. Each game includes a teacher guide and instructional video to help you set up your classroom. All you need to do to access these games is create an account, find a game that works for your class, print the resources, and you are good to go! The only thing you need to purchase to complete these activities is the Breakout Kit. These kits are amazing, but can be pricey. They would make an awesome Donors Choose grant. However, if you are like me and on a tight classroom budget, you can purchase the materials much cheaper on your own.  I ordered my supplies from Amazon because I absolutely love Prime. Here’s a list of the materials you will need to purchase (I’ve included links to items I purchased using Prime):


- 1 Hasp
-1 UV Light (optional)
-1 Invisible Ink Pen (optional)
-1 Small Lockable Box

I wanted to end the school year with a fun activity that would give my students a chance to use their higher level thinking skills, and practice the team work skills they spent the whole year building. When I found the Oh, The Place You'll Go Activity, I knew that I found the perfect breakout session! I always read the Dr. Seuss story to my students at the end of the school year and this activity ties into it perfectly. This game was made with the intent to use it at the beginning of the school year, but you can easily use it for the end of the school year too. When we started the game, I told my students that they had to breakout of third grade in order to go on to fourth.

The game designer, Patti Harju, has done an amazing job making this game teacher friendly. All I needed to do was print out the activity sheets, read the teacher guide, and watch the video on how to setup my classroom. Below are some pictures of how I setup my classroom.


This game gave my students a 45 minute time period to solve the problem. My students were so engaged throughout the entire 45 minutes. They absolutely loved this activity, and I loved watching them think outside of the box! I will definitely be using more of these games in the future!


Monday, February 6, 2017

New Math Resoureces & the Love TpT Sale

I have been hard at work creating some new math resources for my store. I have new third grade math units that align perfectly with the CCSS. I have been using them in my classroom and my students are loving the lessons. I like to use math group rotations while teaching and these lessons are a perfect fit. They give me time to introduce each skill, work with small groups, and keep the other students actively engaged with centers and assessment. So far I have created the following units:


This unit is perfect for introducing multiplication to your students. Teaching your students how to use different multiplication strategies deepens their understanding of multiplication. The strategies explored in this unit are skip counting, using a number line, making arrays, making equal groups, and repeated addition. This unit gives students time to explore, understand, and explain multiplication. 
This unit includes:
-A Smart Board presentation explaining each strategy with assessment
-Homework for each strategy
-Math centers for each strategy
-Anchor charts for key vocabulary
-Multiplication strategy puzzles
-An interactive notebook flipbook on the different strategies
-Assessment


Understanding the properties multiplication can be difficult for students. Teaching your students how to correctly use these properties helps them understand multiplication. The properties explored in this unit are the Zero, Identity, Commutative, Associative, and Distributive Properties. This unit gives students time to explore, understand, and explain the different properties of multiplication.  
This unit includes:
-A Smart Board presentation explaining each property with assessment
-Homework for each property
-Math puzzles for each property
-Anchor charts for key vocabulary
-An interactive notebook flipbook on the different properties
-Assessment


Fractions can be a difficult concept for students. Teaching your students how to correctly read and use fractions helps deepens their understanding. The skills addressed in this pack are fraction basics, unit fractions, fractions of a group, fractions of a set, fractions on a number line, and fractions greater than one. This unit gives students time to explore, understand, and explain fractions. 


This unit includes:
-A Smart Board presentation explaining each skill with assessment
-Homework for each skill
-Math puzzles for each skill
-A choice board for a project based learning approach
-Anchor charts for key vocabulary
-An interactive notebook flipbook on the different fraction skills
-Assessment

Now it's time to show a little love, just in time for Valentine's Day! These resources and everything in my store will be 28% off for the Love TpT sale on February 7-8! Enter the code LOVETpT to receive 28% off all of your purchases. Happy Valentine's Day and happy shopping!


Monday, November 28, 2016

Cyber Monday SALE!


Who doesn't love a sale!?! It's time for the Teachers Pay Teachers annual Cyber Monday Sale! Time to stock up your classrooms and save!

If you are looking for some holiday activities for your classroom, check out my store. I have added a bunch of fun holiday projects and activities.

It's Gingerbread Baby!

If you are planning a gingerbread unit for the holidays, check out my Work, Work as Hard as You Can! It’s a Unit of Fun with theGingerbread Man!  and Area and Perimeter Gingerbread House Project.


The Gingerbread Unit includes activities for each subject area so it can be used for a day of gingerbread fun, over a couple of days, or throughout a week. This unit contains the following five activities:
  1. Search, Search as Hard as You Can! Can You Catch the Gingerbread Man- This activity is played like the game Battleship and reviews using ordered pairs.
  2. Gingerbread Story Activity- During this activity students will read different versions of the Gingerbread Man (a book list is provided to help you easily find books). They will compare the different stories, and use planning sheets to help them create their own version of this classic folktale. Gingerbread publishing papers are included.
  3. Gingerbread Man Measurement- Students will use a Gingerbread Man cut out to measure different items in the room. A recording sheet is provided for this activity along with extension activities for early finishers.
  4. Run, Run as Fast as You Can!- The students join the Gingerbread Man Capture Squad during this science experiment, and explore what happens to their pulse before, during, and after exercise.
  5. The History of the Gingerbread Man- This activity goes over the Gingerbread Man's history and has the student practice their map skills.


This Area & Perimeter Gingerbread House Project is perfect for area and perimeter review during the holiday season. Use this project while teaching to reinforce measurement skills. During this project, students are asked to create a gingerbread house for their school's winter festival. While designing their house, they will include certain design elements and find the different areas and perimeters. A rubric is included for easy grading.


This project is aligned with the Common Core Standards and gives students time to work on their project independently. Use this during math instruction and watch your students blossom!


Christmas Around the World


If you are planning a cultural celebration, check out my Christmas Around the World Packs. I have activities for the following countries; EnglandGermany, MexicoThe Netherlands, and France. Each set includes: 

  • a presentation on each country, and their holiday traditions
  • one or two crafts for each country
  • carol sing-a-longs-a passport with passport stamps
  • a recipe for a traditional dish from each country
  • a word search for each country exploring the new words learned in each lesson

If you want all of the countries listed, I have a complete Christmas Around the World Pack.


Winter Math Games and Centers

If you are looking for winter themed math products, check out my Winter Olympics Multiplication and Division Games and Centers Pack, and my Measurement Winter Olympics Activities. These packs are full of fun math activities that make learning fun!


Happy shopping and Happy Holidays!

Tuesday, October 25, 2016

Challenging Little Learners

I like to offer students choices in their learning. Giving my students the freedom to make choices makes learning meaningful to them.  Every student is unique and learns differently. Some students are musicians, artists, actors, authors, scientists, or engineers. I feel as educators we sometimes forget this. It’s easy to do when you are in the school year rush desperately trying to teach all of the standards before the dreaded state tests. Districts tend to forget this too and try to make us “cookie cutter teachers.” Which is ironic. We teach differently, just like our students learn differently. What works for one teacher may not work for another. We teach through our strengths.

That being said, it’s important that we challenge all of our little learners. We need to give all of our students a chance to grow.  I don’t know about you, but every school year I always have a group of kiddos that need to be challenged. Learning comes easy for this group and they need that extra push. Over the years, I have created different activities for them to complete when they finish their work. I try to make these activities meaningful for them, so they don’t feel like I am punishing them for finishing early.  I feel like I am always looking for activities that will keep those students engaged and deepen their learning.

Over the summer, I came across some great products from MindWare. If you haven’t heard about this company, you need to check them out.  They have amazing products that get children to use their higher level thinking skills and think outside of the box. Which is perfect for my classroom!  


This year I started using the Brain Builders and PerplexorsLet me tell you, they are game changers! They are perfect for integrating STEAM skills into your classroom. The best part is that my students absolutely love using these products!  I have students asking me if they can work on these activities all of the time.


My students LOVE logic problems, so I knew that the Perplexors were a perfect fit for my classroom. My students like the mystery aspect of these problems, and I love the high-level thinking that goes on during these activities.


I like to copy the Perplexors and place them in plastic sleeves so my students can use their dry erase markers and easily erase mistakes.  
The Brain Builders are my favorite. This product is perfect for challenging your visual learners. Brain Builders get students to change the way they look at solving a problem and are a great interactive STEM tool. Each Brain Builder set comes with 20 KEVA planks and a set of double-sided puzzle cards. The puzzles cards have a 2-D challenge on one side and its solution on the other side. When students are completing these tasks, they have to recreate 2D patterns into 3D structures. This is perfect for your visual learners! The 2-D cards show the design from different angles to challenge the students to see things differently. These activities are a perfect addition to any STEM-focused lesson.


When I first started using these products, I had the activities set up in stations throughout the room. Then I did a quick mini-lesson to demonstrate procedures and expectations. When I felt like my students understood these activities, I had them work with partners and complete center rotations. I wanted to make sure that each student felt comfortable with these activities so I could use them throughout the school year.  Now that the students are comfortable with these tools, I use them for early finisher work and problem-solving centers. I feel like these products help teach valuable learning skills for the next generation of learners.